List Box in Excel VBA
A list box is a list from where a user can select an item. To create a list box in Excel VBA, execute the following steps.
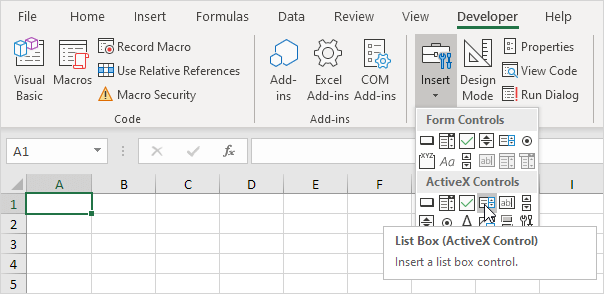
1. On the Developer tab, click Insert.
2. In the ActiveX Controls group, click List Box.

3. Drag a list box on your worksheet.

Note: you can change the name of a control by right clicking on the control (make sure Design Mode is selected) and then clicking on Properties. For now, we will leave ListBox1 as the name of the list box.
Create a Workbook Open Event. Code added to the Workbook Open Event will be executed by Excel VBA when you open the workbook.
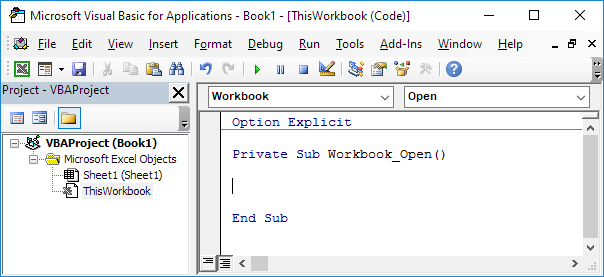
4. Open the Visual Basic Editor.
5. Double click on ThisWorkbook in the Project Explorer.
6. Choose Workbook from the left drop-down list and choose Open from the right drop-down list.

7. To add items to the list box, add the following code lines to the Workbook Open Event:
.AddItem "Paris"
.AddItem "New York"
.AddItem "London"
End With
Note: use Sheet2 if your list box is located on the second worksheet, Sheet3 if your list box is located on the third worksheet, etc. If you use these code lines outside the Workbook Open event, you might want to add the following code line before these code lines. This code line clears the list box. This way your items won't be added multiple times if you execute your code more than once.
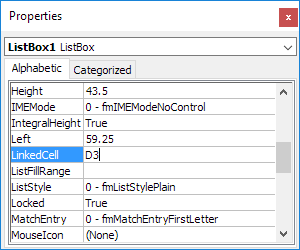
8. To link this list box to a cell, right click on the list box (make sure Design Mode is selected) and click on Properties. Fill in D3 for LinkedCell.

Note: also see the ListFillRange property to fill a list box with a range of cells.
9. Save, close and reopen the Excel file.
Result:

Although in some situations it can be useful to directly place a list box on your worksheet, a list box is particularly useful when placed on a Userform.