Interactive Userform in Excel VBA
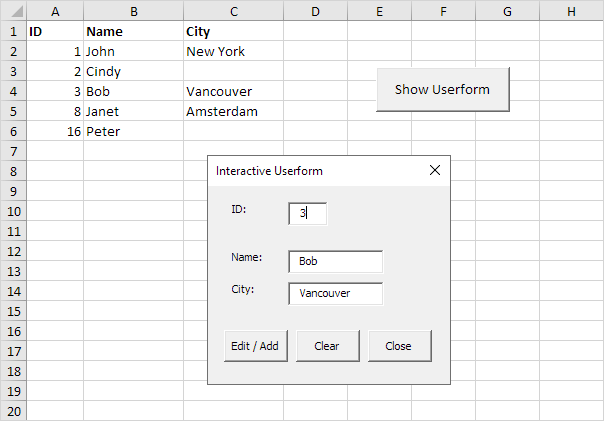
Below we will look at a program in Excel VBA that creates an interactive Userform. The Userform we are going to create looks as follows:

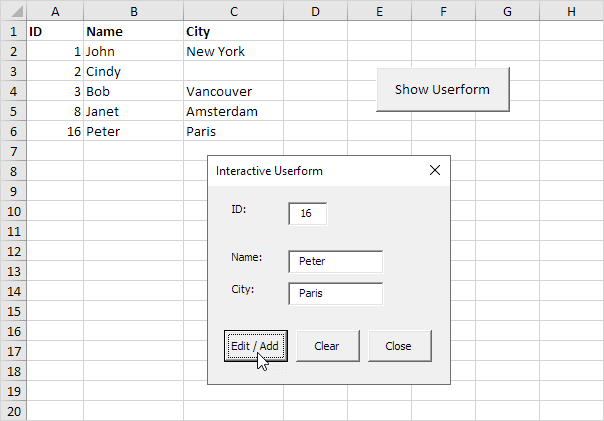
Explanation: whenever you enter a value in the ID text box, Excel VBA loads the corresponding record. When you click the Edit / Add button, Excel VBA edits the record on the sheet or adds the record when the ID does not yet exist. The Clear button clears all the text boxes. The Close button closes the Userform.
To create this Userform, execute the following steps.
1. Open the Visual Basic Editor. If the Project Explorer is not visible, click View, Project Explorer.
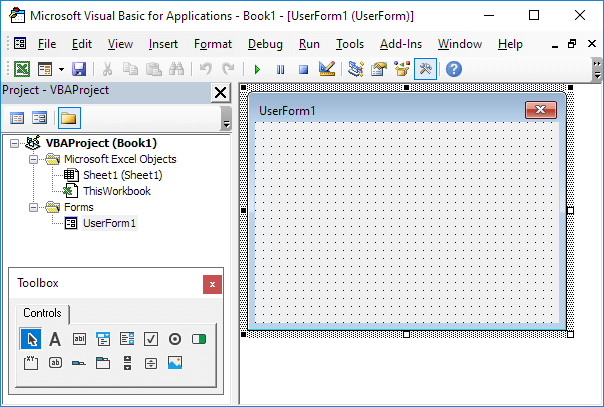
2. Click Insert, Userform. If the Toolbox does not appear automatically, click View, Toolbox. Your screen should be set up as below.

3. Add the labels, text boxes (first at the top, the second below the first, and so on) and command buttons. Once this has been completed, the result should be consistent with the picture of the Userform shown earlier. For example, create a text box control by clicking on TextBox from the Toolbox. Next, you can drag a text box on the Userform.
4. You can change the names and the captions of the controls. Names are used in the Excel VBA code. Captions are those that appear on your screen. It is good practice to change the names of the controls, but it is not necessary here because we only have a few controls in this example. To change the caption of the labels, text boxes and command buttons, click View, Properties Window and click on each control.
5. To show the Userform, place a command button on your worksheet and add the following code line:
UserForm1.Show
End Sub
We are now going to create the Sub UserForm_Initialize. When you use the Show method for the Userform, this sub will automatically be executed.
6. Open the Visual Basic Editor.
7. In the Project Explorer, right click on UserForm1 and then click View Code.
8. Choose Userform from the left drop-down list. Choose Initialize from the right drop-down list.
9. Add the following code line:
TextBox1.SetFocus
End Sub
Explanation: this code line sets the focus on the first text box as this is where we want to start when the Userform is loaded.
We have now created the first part of the Userform. Although it looks neat already, nothing will happen yet when we enter a value in the ID text box or when we click one of the command buttons.
10. In the Project Explorer, right click on UserForm1 and then click View Code.
11. Choose TextBox1 from the left drop-down list. Choose Change from the right drop-down list.
12. Add the following code line:
GetData
End Sub
13. In the Project Explorer, double click on UserForm1.
14. Double click on the Edit / Add command button.
15. Add the following code line:
EditAdd
End Sub
16. Double click on the Clear command button.
17. Add the following code line:
ClearForm
End Sub
Explanation: these subs call other subs we are going to create in a second.
18. Double click on the Close command button.
19. Add the following code line:
Unload Me
End Sub
Explanation: this code line closes the Userform.
Time to create the subs. You can go through our Function and Sub chapter to learn more about subs. If you are in a hurry, simply place the following subs into a module (In the Visual Basic Editor, click Insert, Module).
20. First, declare three variables of type Integer and one variable of type Boolean. Declare the variables in the General Declarations section (at the top of the module). This way, you only have to declare the variables once, and you can use them in multiple subs.
21. Add the GetData sub.
If IsNumeric(UserForm1.TextBox1.Value) Then
flag = False
i = 0
id = UserForm1.TextBox1.Value
Do While Cells(i + 1, 1).Value <> ""
If Cells(i + 1, 1).Value = id Then
flag = True
For j = 2 To 3
UserForm1.Controls("TextBox" & j).Value = Cells(i + 1, j).Value
Next j
End If
i = i + 1
Loop
If flag = False Then
For j = 2 To 3
UserForm1.Controls("TextBox" & j).Value = ""
Next j
End If
Else
ClearForm
End If
End Sub
Explanation: If the ID text box contains a numeric value, Excel VBA searches for the ID and loads the corresponding record. We use the Controls Collection to easily loop through text boxes. If Excel VBA cannot find the ID (flag is still False), it empties the second and third text box. If the ID text box does not contain a numeric value, Excel VBA calls the ClearForm sub.
22. Add the ClearForm sub.
For j = 1 To 3
UserForm1.Controls("TextBox" & j).Value = ""
Next j
End Sub
Explanation: Excel VBA clears all the text boxes.
23. Add the EditAdd sub.
Dim emptyRow As Long
If UserForm1.TextBox1.Value <> "" Then
flag = False
i = 0
id = UserForm1.TextBox1.Value
emptyRow = WorksheetFunction.CountA(Range("A:A")) + 1
Do While Cells(i + 1, 1).Value <> ""
If Cells(i + 1, 1).Value = id Then
flag = True
For j = 2 To 3
Cells(i + 1, j).Value = UserForm1.Controls("TextBox" & j).Value
Next j
End If
i = i + 1
Loop
If flag = False Then
For j = 1 To 3
Cells(emptyRow, j).Value = UserForm1.Controls("TextBox" & j).Value
Next j
End If
End If
End Sub
Explanation: If the ID text box is not empty, Excel VBA edits the record on the sheet (the opposite of loading a record as we have seen earlier). If Excel VBA cannot find the ID (flag is still False), it adds the record to the next empty row. The variable emptyRow is the first empty row and increases every time a record is added.
24. Exit the Visual Basic Editor, enter the labels shown below into row 1 and test the Userform.
